For those of you new to my site, I retired as a a Stampin' Up Independent Demonstrator
To "Follow", Subscribe, please go down to the right!
Thursday, November 26, 2009
Happy Thanksgiving!
Happy Thanksgiving!!!
Please tell me something fun you did today??!!!
What is your favorite thing to eat or make?
I do not like turkey! When I was young, I told my mom I was going to teach my kids that the Pilgrams ate Fried Chicken and BBQ ribs, because those are my favorite foods!
What is your favorite food on Thanksgiving?
Well now it is almost 8 pm and we still have not eaten! My husband grilled the turkey and it is taking longer than we thought. My thought is ....skip the turkey!
Monday, November 23, 2009
It's here! Gigantic Stampin' Up Sale!!
IT'S HERE, IT'S HERE, IT'S HERE!
Our Huge Stampin' Up Sale!!!
To order click HERE
*Then go to Products,
*Then click on Shop Now ,
*Then click on Online Extravaganza
*Don't forget to check out the Clearance Rack while you are there!
*Then place your order!!
Please email me by clicking on the little envelope if you have any questions.
These items must be ordered ONLINE!
Enjoy the Sale! Have fun shopping!!
Sunday, November 22, 2009
A bit of Holiday Whimsy!
Last night my little girl and I did a bit of decorating. I know it is early but I have never skipped decorating and I did this past Halloween and Fall due to being so exhausted. Well yesterday we got into the spirit and thought, lets start right now for the Winter!
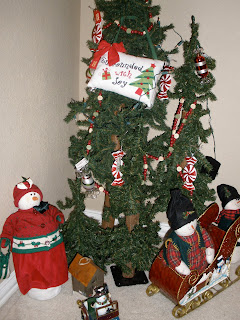
This is my most favorite tree of all! I searched and searched for what I call "Charlie Brown" looking trees. You know, the kind that look pathetic and like no one wants them! Well I found this at a craft fair years ago. It was decorated just like this, with tons of little pillows and wood snowmen and a strand of wood cranberries. I added the ceramic birds on it and a little nest. I keep this out all year long in my living room. It makes me happy. I moved it this year to the family room in front of the fireplace. Boy was it dusty! I later found out the lady who sold them was no longer making them, but she invited me over and I bought two more "bare" trees. I keep one in my entry way year round and change it out seasonally. The other stays in the attic until this time of year and is then converted into a Gingerbread tree!
This is my Snowman Mantel. Sometimes I leave it out until February! Usually this houses our wedding photos and the kid's baby pictures. This is my most favorite box to pull out. These are my most favorite snow people even though I have many throughout the house all year long. I get sad putting these guys away!
I just love this bench I have in the entry way. It is tall and black wood with mirrors and hooks. Usually it holds my millions of Vera purses I have! We also have some funny wood signs that we change out on it. For now, I had to clear away my purses and it has a garland of wooden snowmen that I found at a craft fair years ago. It also holds a set of glittery iceskates! My husband bought me the wood truck years ago. It says "Frostys's Snow Removal" on it. I always have seasonal pillows on here too. It would be nice if I left room for the kids coats!
This is another one of the "Charlie Brown" trees. This is in the entry way next to the bench. I keep this tree here all year long and change it out for each season! This tree has a garland of wood cranberries and buttons and a mitten garland. I found these tiny wood ornaments that are real old fashioned and in wood frames in the black and white. I just love them. There are also some iceskate and sled ornaments. It is just real simple and "woodsy" and old fashioned.
This is my little girl's Gingerbread House area and Gingerbread Tree. All of the ornaments are
Gingerbread boys and girls. The houses are from Party Lite or Dept 56. I used to sell for a company that was called Time to Celebrate and they sold these darling Dept 56 houses. They are so much fun and so whimsical. She plays with these for hours on end. I also have a Gingerbread area in my kitchen which holds all of the tea light Gingerbread houses.
This little area is on the landing going upstairs. This is the area my little girl is in charge of, well I think she plans out most of the decorations because she plays with them all! We used to put ornaments that were special adoption ornaments or ornaments they made or were made from the country they are from, but we are going to buy some "woodsy" looking ornaments to put on this year.
This is my little girl's Village. She has a darling Halloween one and it is her favorite and she hates to see it put away. This year, I suggested we pull out their ancient "train table" their daddy built and keep her village in her room. We have to get some more snow an spruce it up. She plays for hours on end with this! She also has a "Peppermint Lane" on the landing outside of her room!
And last but not least! Pink "Sweet" Tree. I saw this tree at Kohls and just figured it was a display. I called the next day and they had one coming in and I was able to get the one and only one. I bought pretty little candy and cake ornaments for it. It is not a good photo but the tree is so cute and looks great in her purple bedroom!
I hope you enjoyed our little bit of Holiday Whimsy! The photos don't really do it justic, but you can click on them to get a better view. Come on over for some homemade goodies! We will be baking a lot!
Wednesday, November 18, 2009
Sorry for no posts
HI everyone. Sorry for no posts lately. My sweet son has missed a week of school due to feeling very ill. I have not had a chance to do a thing. Hopefully he can return to school tomorrow. I hope so for his sake! I have about 6 more cards to make for my shop's order that are due on Friday, so I hope to get some work done. Hopefully I will get to craft some fun things next week on the Thanksgiving break. You all have a safe one!
Monday, November 16, 2009
My SU Christmas Card Workshop!!!
Ahh, finally got the photos loaded. These are some of my SU workshop gals making a ton of holiday cards last Saturday. I packaged together a Christmas Jingle "Card Kit". All the ladies had to bring were their scissors and trimmers and then copy the examples I had made up or create their own. They really got a lot done that day and we had a lot of fun!
Here are Latoya and Patty. Patty kept asking if I was going to take photos, so I finally did! This was Latoya's first time and she did great by making her first card and putting up with us crazy ladies!
My long time buddy, Melanie, neighbor Linda and friend, Kerry are making a ton of cards.
Carmen and her little sis,Evelyn (from my little girl's cake class). Evelyn certainly had us all entertained!
And me with my chubby ole'face- thanks for the close up, Patty!
Yvette and Carol, sorry you could not make it but I have your kits for you! I really had a fun time. Evelyn and Melanie, thanks for bringing the yummy pumpkin surprises!
photo problems
Sorry ladies, I have been trying to post our workshop photos since last night. It is so strange, I see them in my iphoto but when I click on the photo button here on blogger, those photos do not show up. I go back into my iphoto and they are there, then I come back to blogger and try to load them and they are not in my iphoto. Crazy, I know but I hope to somehow get the photos posted of our fun time!
Sunday, November 15, 2009
Thank you, Everyone! I have a few Surprises!
Good morning. I want to thank you EVERYONE for all of your comments during my
week with CWTC! This was a last minute thought on Saturday, but last night, I went
back over all the comments and entered in everyone's name that had left a comment this past week! I pulled out 6 names, one for each day and then an extra one for today!
Will the following people please EMAIL me for your special, little surprise! See EMAIL button to the right. Thank you everyone! Hope you stop back by!
1 Janst
2 Eiyiyi
3 Bridget L
4 Sandy from Ukiah
5 LisaRN499
6. Leirad
7. Always Charlie
Saturday, November 14, 2009
Christmas with the Cricut Saturday's Gift
HI everyone. Today is the last day for my CWTC Projects. I want to thank Joy, Melanie and Tammy at CWTC and McKay at Provo Craft and for this opportunity to be a Guest Designer.
I have truly enjoyed it, as I have challenged myself to think " out of the box".
Today's project features my Gift for Saturday. I used both the Winter Woodland and the Mini Monograms Cartridges for this project.
You are probably wondering what in the world this is? Well my little girl actually designed this and she is 11 years old! I have to give her all the credit for this one! This is a "triple Clipboard" from Stampin' Up. Isn't it cute with those three clips! She suggested using the houses from Winter Woodland and putting one under each clip. She has made one up prior to this and I will show this at another time. You should scroll down and see the cakes she decorated!
After this was finished we printed out some calendar "clipboard sheets" from the computer. The third spot will hold some Post-it note pads. I also made some little boxes by scoring some paper (idea from Splitcoaststampers) and then added little tags using Mini Mongrams. The boxes are shown below and can hold the post it notes.
Each year, I make a new little "Gift List" book. I think the kids are "on to me" now and know where to look for what gifts I have bought them! I used the SU Spiral Punch for the edges, so easy to alter this little notebook with this handy, dandy punch. Here is my favorite little Snowman, again! I love the font from this Cart!
Put it all together and you have a really nice gift for someone! I think I want to keep it for myself!
Materials Used:
Winter Woodland Cartridge
Mini Monograms Cartridge
Basic Grey Eskimo Kisses Patterned Paper
Spiral Notebook to alter. I have tons of these in my stash
The following items are all from Stampin' Up
Chocolate Chip, Whisper White and Pretty in Pink Cardstock
Ribbon (retired)
Felt Snowflakes, and Crystal embellishments ( retired)
Whisper White Craft Ink to "paint" the clipboard
On Board Triple Clipboard
Spiral Punch
Thank you for supporting me all week long, with your wonderful comments and emails. They sure were appreciated and I also appreciate those of you who signed up to follow. I had a wonderful time making these projects. CTWC girls, thank you for the honor. McKay, thank you for the WW Cartridge!
If anyone has any questions on what supplies I used and what sizes I cut the items out, or how to make any of the items I showcased this week, please feel free to click the EMAIL button on the right and ask.
Also, if anyone would like to order any of the Stampin' Up supplies from me, just click on the Email me button or click HERE !
If you are not on on MY Stampin' Up Email List, to hear about my monthly specials and other SU promotions, and would like to be, please Email me!
Thank you again. for all of your valued comments! I hope you can scroll through my blog and check out everything else!
One last hop over to Okie's blog! Didn't she do an awesome job this week! Be sure to visit Jeannie's and Susan's blogs next week!
Thank you! Barb~ stay tuned for a surprise tomorrow, too!
I have truly enjoyed it, as I have challenged myself to think " out of the box".
Today's project features my Gift for Saturday. I used both the Winter Woodland and the Mini Monograms Cartridges for this project.
You are probably wondering what in the world this is? Well my little girl actually designed this and she is 11 years old! I have to give her all the credit for this one! This is a "triple Clipboard" from Stampin' Up. Isn't it cute with those three clips! She suggested using the houses from Winter Woodland and putting one under each clip. She has made one up prior to this and I will show this at another time. You should scroll down and see the cakes she decorated!
After this was finished we printed out some calendar "clipboard sheets" from the computer. The third spot will hold some Post-it note pads. I also made some little boxes by scoring some paper (idea from Splitcoaststampers) and then added little tags using Mini Mongrams. The boxes are shown below and can hold the post it notes.
Each year, I make a new little "Gift List" book. I think the kids are "on to me" now and know where to look for what gifts I have bought them! I used the SU Spiral Punch for the edges, so easy to alter this little notebook with this handy, dandy punch. Here is my favorite little Snowman, again! I love the font from this Cart!
Put it all together and you have a really nice gift for someone! I think I want to keep it for myself!
Materials Used:
Winter Woodland Cartridge
Mini Monograms Cartridge
Basic Grey Eskimo Kisses Patterned Paper
Spiral Notebook to alter. I have tons of these in my stash
The following items are all from Stampin' Up
Chocolate Chip, Whisper White and Pretty in Pink Cardstock
Ribbon (retired)
Felt Snowflakes, and Crystal embellishments ( retired)
Whisper White Craft Ink to "paint" the clipboard
On Board Triple Clipboard
Spiral Punch
Thank you for supporting me all week long, with your wonderful comments and emails. They sure were appreciated and I also appreciate those of you who signed up to follow. I had a wonderful time making these projects. CTWC girls, thank you for the honor. McKay, thank you for the WW Cartridge!
If anyone has any questions on what supplies I used and what sizes I cut the items out, or how to make any of the items I showcased this week, please feel free to click the EMAIL button on the right and ask.
Also, if anyone would like to order any of the Stampin' Up supplies from me, just click on the Email me button or click HERE !
If you are not on on MY Stampin' Up Email List, to hear about my monthly specials and other SU promotions, and would like to be, please Email me!
Thank you again. for all of your valued comments! I hope you can scroll through my blog and check out everything else!
One last hop over to Okie's blog! Didn't she do an awesome job this week! Be sure to visit Jeannie's and Susan's blogs next week!
Thank you! Barb~ stay tuned for a surprise tomorrow, too!
Friday, November 13, 2009
Christmas with the Cricut Fancy Card Friday!/Video!
Hi friends,
It is time for Fancy Card Friday from CWTC
This was my most fun project to do!
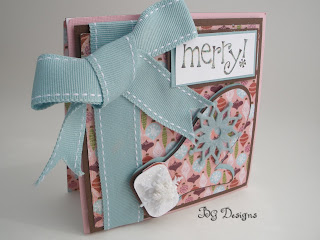
Again, I have made two cards for this day. Be sure to check out the Video on the second card, below. I really had fun making these! I started them out as my "simple cards" but switched them to the "Fancy" card category! I wish you could see this one in person, it is so much prettier and just sparkles with glitter! I think this is my favorite card but it looks much better in person. Enjoy!
Merry Mitten Card
Merry Mitten Materials:
Winter Woodland Cartridge
Basic Grey Eskimo Kisses Double Sided Paper
Plastic Snowflake embellishment from last year's stash!
The following are all from Stampin' Up:
Chocolate Chip , Whisper White, Pretty in Pink and Baja Breeze (retired) Cardstock
Baja Breeze Ribbon (retired)
Chocolate Chip and Real Red Inks
Dazzlin' Diamonds and retired Little Felt Flurries
Stampin' Dimensionals and adhesive
Merry Set (retired)
Fancy Tree Card- to see "how to make" Video, please click HERE
Fancy Tree Card Materials:
Mini Monogram Cartridge for the Scalloped square
Winter Woodland Cartridge for the Tree
Basic Grey Eskimo Kisses Double sided paper
Peachy Pink Cardstock from my stash
The following items are all from Stampin' Up:
Chocolate Chip, and Whisper White Cardstock
Chocolate Chip 1 1/4" Double stitched ribbon
Chocolate Chip and Ruby Red Inks
Chocolate Chip Ink Spot
Stampin' Dimensionals and adhesive
All Holidays Stamp Set (front)
Level One Holiday Best Hostess Stamp Set (inside)
Thank you again so much for all of the nice comments and emails too!
If do not have a blogger account and want to make a comment, if you use the Anonymous button, please put your name so I know who you are :) (unless you want to be anonymous!)
Now, let's head on over to Okie's blog, to see what a fantastic card she made!
It is time for Fancy Card Friday from CWTC
This was my most fun project to do!
Again, I have made two cards for this day. Be sure to check out the Video on the second card, below. I really had fun making these! I started them out as my "simple cards" but switched them to the "Fancy" card category! I wish you could see this one in person, it is so much prettier and just sparkles with glitter! I think this is my favorite card but it looks much better in person. Enjoy!
Merry Mitten Card
Merry Mitten Materials:
Winter Woodland Cartridge
Basic Grey Eskimo Kisses Double Sided Paper
Plastic Snowflake embellishment from last year's stash!
The following are all from Stampin' Up:
Chocolate Chip , Whisper White, Pretty in Pink and Baja Breeze (retired) Cardstock
Baja Breeze Ribbon (retired)
Chocolate Chip and Real Red Inks
Dazzlin' Diamonds and retired Little Felt Flurries
Stampin' Dimensionals and adhesive
Merry Set (retired)
Fancy Tree Card- to see "how to make" Video, please click HERE
Fancy Tree Card Materials:
Mini Monogram Cartridge for the Scalloped square
Winter Woodland Cartridge for the Tree
Basic Grey Eskimo Kisses Double sided paper
Peachy Pink Cardstock from my stash
The following items are all from Stampin' Up:
Chocolate Chip, and Whisper White Cardstock
Chocolate Chip 1 1/4" Double stitched ribbon
Chocolate Chip and Ruby Red Inks
Chocolate Chip Ink Spot
Stampin' Dimensionals and adhesive
All Holidays Stamp Set (front)
Level One Holiday Best Hostess Stamp Set (inside)
Thank you again so much for all of the nice comments and emails too!
If do not have a blogger account and want to make a comment, if you use the Anonymous button, please put your name so I know who you are :) (unless you want to be anonymous!)
Now, let's head on over to Okie's blog, to see what a fantastic card she made!
Labels:
Video
,
Winter Woodlands
Thursday, November 12, 2009
Christmas with the Cricut Layout Thursday
Hi there, I am Barb with Snowmanlover's Paperie. Today I am going to show you what I made for Thursday's layout with CWTC with the Winter Woodland Cartridge.
Now, I do have to tell you first, that I am not one for fancy layouts, for my own personal use. I save that for cards. I have taught scrapbooking classes for over 10 years and I always stress that the photos are the most important thing on your pages! I like my main focus on the layouts to be the subjects in my photos. This one is a "double page spread", which is the way I scrapbook in all of my albums. Honestly, this is fancier that what I usually make. I typically like to get about 6-8 photos on both pages, and I use 12x12 albums, mostly but have made many smaller ones especially for gifts.
I just love this Winter Woodland Cart so much! Check out the great font it makes too!
Oh and the little hat, scarf, mittens and iceskates were so much fun to make! So many great features on this Cartridge! You could also use the square scallops on Mini Monograms to make some darling backround for the photos!
Now all I need is snow, which we don't get here in Texas! :(
Frosty Kisses Layout
Materials Used:
Winter Woodland Cartridge
Basic Grey Eskimo Kisses Double Sided Paper
The following are all from Stampin' Up
Pretty in Pink, Chocolate Chip, Baja Breeze and Parisian Breeze (retired) Cardstock
Embellishments (retired) and Stampin' Dimensionals and adhesive
Thanks for leaving your delightful comments and signing up to follow. I appreciate it!
Oh, I have had several people ask me how to leave a comment? All you do is click on comment below! To "Follow", just click Follow over to the right! Thanks for stopping by!
Time to hop on over to Okie's Blog
Now, I do have to tell you first, that I am not one for fancy layouts, for my own personal use. I save that for cards. I have taught scrapbooking classes for over 10 years and I always stress that the photos are the most important thing on your pages! I like my main focus on the layouts to be the subjects in my photos. This one is a "double page spread", which is the way I scrapbook in all of my albums. Honestly, this is fancier that what I usually make. I typically like to get about 6-8 photos on both pages, and I use 12x12 albums, mostly but have made many smaller ones especially for gifts.
I just love this Winter Woodland Cart so much! Check out the great font it makes too!
Oh and the little hat, scarf, mittens and iceskates were so much fun to make! So many great features on this Cartridge! You could also use the square scallops on Mini Monograms to make some darling backround for the photos!
Now all I need is snow, which we don't get here in Texas! :(
Frosty Kisses Layout
Materials Used:
Winter Woodland Cartridge
Basic Grey Eskimo Kisses Double Sided Paper
The following are all from Stampin' Up
Pretty in Pink, Chocolate Chip, Baja Breeze and Parisian Breeze (retired) Cardstock
Embellishments (retired) and Stampin' Dimensionals and adhesive
Thanks for leaving your delightful comments and signing up to follow. I appreciate it!
Oh, I have had several people ask me how to leave a comment? All you do is click on comment below! To "Follow", just click Follow over to the right! Thanks for stopping by!
Time to hop on over to Okie's Blog
Wednesday, November 11, 2009
Christmas with the Cricut Gift Packaging Wednesday
Hi there! I am guest designing for CWTC this week. I will be showcasing the Mini Monograms and Winter Woodlands carts on my Gift Packaging Wednesday project.
Thank you for taking the time to comment on my projects. They are most appreciated!
Materials used:
Mini Monograms Cartridge on the scalloped squares. I just love scallops and I love squares too. The minute I found these boxes, I knew the squares from Mini Monograms would be perfect! I also hit the "stitched" button to cut out the red squares.
Wood boxes from Michael's
All of the following from Stampin' Up and it is all "matchy, matchy!:
Merry Moments Designer Paper~ isn't it pretty!
Real Red and Whisper White Cardstock
Whisper White and Red Polka Dot Ribbons
Real Red Marker
Stampin' Dimensionals, adhesive
Cropodile for the punched holes
Wilton Lollipop stick for my little Snowman tag. Can you tell I LOVE this Snowman! He is made out of Winter Woodland using SU Whisper White Paper.
I am VERY picky about my snowmen but I adore this one because it has a very old fashioned look.
Think of all the great things you can put in here!
I plan on putting my homemade Peppermint Bark in here! Thanks to my sweet friend, Evelyn for taking me to the candy shop in Dallas!
But just think of all the other things you can put in here: Office Supplies, Beauty Supplies, Gift Cards!
Hmmm, I wonder if JOY thinks this present is for her!!
OK, by now you know the drill, Hop on over to Oakie's blog!
Tuesday, November 10, 2009
Christmas with the Cricut Home Decor' Tuesday
Hello!! I am Barb with Snowmanlover's Paperie. My project for, Home Decor' Tuesday is very simple. In fact these are so easy that these would be something fun you could make with your kids!
I used both the Mini Monograms Cartridge and also Winter Woodlands . I was trying to make Peppermint candies for the letters out of Mini Monograms but they did not turn out that way, so I just made the little Scallops from Mini Monograms instead, with the letters spelling Merry. But guess what? Now PC has a cart coming out with a Peppermint Candy tag!
These three items were made out of some frames I had around the house.
My little Elf!
Mini Monograms Cartridge
Basic Grey Double Sided Figgy Pudding Paper
Stampin'Up Chocolate Chip, Baja Breeze Cardstock
Cranberry Cardstock and Peppermint Candies from my old stash
Stampin' Up Dimensionals and retired ribbon
Sleigh Frame
Winter Woodlands Cartridge
Basic Grey Figgy Pudding and Eskimo Kisses doube sided Paper
Stampin' Up Real Red, Old Olive, Chocolate Chip Cardstock
Stampin' Up Stampin' Dimensionals, adhesive and retired ribbon
Snowman Frame
Winter Woodlands Cartridge
Basic Grey Eskimo Kisses Buttons
Basic Grey Eskimo Kisses Double Sided Paper
Core'dination's White Washed and Cranberry Cardstock
White Uni-ball Pen which turned pink on the Core'dinations Paper but I like it!
Remember yesterday's card? This little combo is going to be a gift for someone! Shhh!
I was all finished with my projects but saw this darling Gingerbread Man box and just had to add him to my holiday decorations.
I used Mini Monograms Cartridge for the little guy's buttons. These are made from the "stitched" scallop circles. I love that stitching. It is hard to see on the black but they are little cut out marks. I also used the cartridge for the little "ornaments" he is holding.
Other materials:
Patterned Paper from Hobby Lobby
Stampin' Up Basic Black Cardstock
Dress it Up Christmas Eve buttons
Ranger Silver Stickles
Stampin' Up White Uni-ball Pen and Stampin' Dimensionals to give it some pop.
I just love these little guys. I am going to make a whole bunch of them and line them up on my staircase. Besides being able to use them for Home Decor', they have a lid that comes off and you could use them for packaging too!
To leave a comment, just click on "comment". Thanks so very much for stopping by!
Now hop on over to Okie's blog for some real talent!
Monday, November 9, 2009
Christmas with the Cricut Simple Card Monday! Video!
Hi there, I am Barb from Snowmanlover's Paperie.
I am so honored to be a "Guest Designer" with CWTC!
Thank you, Joy, Melanie, Tammy, Provo Craft and Core'dinations!
I really enjoyed creating my projects, so I hope you like!
My assignments this week are to use the Winter Woodlands and Mini Monogram Cartridges. Some of the projects will focus on both and some will be using one or the other. By the way, I am so into "non-traditional" Christmas colors for some reason this year!
Today is Simple Card Monday. I couldn't stop with just one so here are my two simple cards. Of course you know I love snowmen, so here is my first card!
Click HERE to see the VIDEO on how to make this simple little snowman card.
Simple Snowman
Materials used:
Winter Woodlands Cartridge
Basic Grey Eskimo Kisses Double Sided Patterned Paper
Core'dination's White Washed and Cranberry Cardstock
Paper Trey Ink Cardstock
All the following from Stampin' Up:
Chocolate Chip and Whisper White Cardstock
Chocolate Chip Ink
Chocolate Chip 1 1/4" Stitched Ribbon and retired curly brown ribbon
Merry Stamp Set (retired)
Stampin' Dimensionals and adhesive
This is my second card with Winter Woodlands. Might I mention, I just adore this Winter Woodlands Cartridge. I feel a real sense of serenity with all the "woodsy" stuff.
Woodsy Cardinal Card
Materials Used:
Winter Woodlands Cartridge
Basic Grey Eskimo Kisses Double Sided Patterned Paper
Core'dinations Cranberry Cardstock
and the following all from Stampin' Up:
Chocolate Chip, Kraft and Whisper White Cardstock
Level One Hostess Holiday Best Stamp Set
Jingle Bells Ribbon
Dimensionals and Uni-ball Signo Pen
Real Red Ink
Thank you so much for stopping by to take a look! I hope you can stop by each day this week.
Now hop on over to see Oakie's site, please to see her Simple Card Monday project.
Labels:
Mini Monograms
,
Video
,
Winter Woodlands
Sunday, November 8, 2009
Tomorrow is finally the DAY!
Well it is almost finally here! I was asked back in August by the ladies at CWTC to be a Guest Designer for the week of November 9th. I was shocked to be asked, what an honor! These three ladies are just so incredibly talented and fun!
I did all my projects early on and had so much fun! The real challenge came with the techno side and I have to thank Bug Junkie Lisa and The Cricut Lady Lori for finding Flip Cameras. Lisa and Christina from Creations with Christina helped me with the video questions and I can't forget my dear little girl. She filmed for me and hooked them up to my computer, bless her little heart. She even got all my materials out for my cards, that I needed for the videos and redid and redid and redid the videos for me! Thank you to my dear buddy, Lorrie for endlessly helping me with my signature on my photos and Christina again for helping me with a blog siggy that will start next week. Thank you Joy, Melanie and Tammy for putting up with all of my photo retakes!
Well I hope you join me this entire week to view the fun projects I had to make. I just am floored at the gorgeous work that Christina and Teri Beri did this past week. They have always been such great designers but this last week, wow, their talent is fantastic.
Well, please be sure to check out each and every day, the funny, the hilarious, and the extremely talented Shirley aka Okie at her blog. She will also be a guest designer this week for CWTC
Labels:
Just me
Friday, November 6, 2009
Just a few spots left in my SU clubs for the new year!
Hi there! I have just a few spots left for my upcoming Stampin' Up Clubs, starting in January.
If you are interested, please reply as soon as possible so I can get these clubs firmed up.
Your choices are:
*$37.50 per month (retail) Hostess Club
*$50 per month (retail) Hostess Club
$56 per month (total cost) Marker/Cardstock Club
Please see October 27th post for more details.
If you are interested, please contact me by clicking on the Email button to the right!
*Ship, tax and reship are not included in this cost
Labels:
Stampin' Up Clubs
Subscribe to:
Posts
(
Atom
)