I am just loving these Sweet Treat Cups by Stampin' Up. How many of you would love to either be able to refill them or to not have them torn apart after kindly giving someone one? Well I thought I had come up with a workable solution until I found a tutorial by Demonstrator Kim Wilson at Craft Doc. I have to give her TONS of credit because SHE came up with THIS superb idea. I am passing it along in hopes of helping you !
I am going to try to take you step by step to show you how I made my card using the "Kim Wilson" method! I am doing this "Tutorial" so I can help those of you that have bought these cups and don't know how to work them. I do hope this tutorial is helpful to you and would appreciate any feedback on it, please.
First of all here are all the supplies I used including all the punches and pre-cut paper and stamp set. For a detail list of sizes of pre-cut papers, please Email me.

First center your punch at the bottom of your card and punch out a circle with the 1 3/4" punch. Do the same on the Black Cardstock.

Next stamp two images of the Sweet Centers Halloween Stamp with Elegant Eggplant Classic Ink on the Whipser White Paper. Trim around the edges.

Adhere one of the stamped images on the Only Orange Card Stock and trim around the edge.

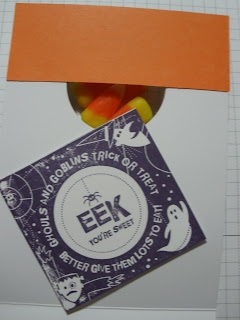
Now punch a hole in the stamped image on the orange cardstock with the 1 3/4" Punch and save the little " Eeek" circle. Only punch the hole on one of them. Save the EEK! Trim your EEK with the 1 3/8" Circle Punch.

Adhere your ribbon with your tape runner. I ALWAYS use my grid paper to line eveything up!

Take the adhesive off the Sweet Treat Cup and place cup directly over the hole on the black cardstock.

Place the Stamped Image on Orange Card stock over the hole.

Now Turn card over and place Orange Cardstock Strip on the top. Adhere the strip on the TOP and Sides only. Do NOT adhere on the bottom. I used my tape runner. Place a few Candy Corns in the little cup.

Take your other "intact" stamped image with the Eek facing the correct direction and slip it right under the orange strip. This is going to be your tab to pull down. It should be white from the inside of the card and the front of the card, should show the Eek through the little clear cup. I am not showing it turned upside down but I want you to make sure that you put the Eeek in the correct way.

After you turn over the printed stamped image so it looks correct from the front, it looks like this ( blank) from the inside of the card.

Punch out a little Scallop Circle on the Black Cardstock. Adhere the extra little Eek

Now take your little "Eek" and place in on a punched out Scallop Circle on Black Cardstock.

This is now your little Tab to pull down and it will expose the candy. This was the Kim Wilson idea! Putting in the little scallop is my idea! Cute huh!!??

Almost finished. Time to adorn the ribbon. Stamp a Halloween Sentiment on whisper white and cut out with the Word Window Punch. I used the Halloween Hi sentiment from the Level Three Hostess Stamp Set.

Now punch out a little background for you sentiment with some Only Orange Cardstock, using the Modern Label Punch. Adhere to card.

Now your card is all done and ready to slide your candies in and out!

Please leave me a comment on the tutorial and ask me any questions if you do not understand.
If you are interested in ordering any of these supplies, please click HERE.
Thank your for viewing. I would appreciate a "Critique"!


10 comments :
I think that is sooo cute Barb... great tutorial....
that was extremely clear and straightforward :) Great tutorial, hmmmm I feel a craving for candy corn coming on :) :)
You did a fantastic job on the tut...thanks
Say, I just wanted to let you know that I live in the desert in Riverside county. It is about 89 miles from the coast (don't ask me why we moved from the coast to here). Anyway, my temperatures are about the same as Briget's summer and winter....I think that I'm a little cooler then her...♥
Great tutorial Barb, these little treat cups are so cute
hugs
En xx
Barb great tutorial!!! I am sooo excited to make these! Thank you for all your help!
hugs
Brenda
Great Tutorial~ Thanks, can't wait to try it out!
Too stinkin' cute! Great project! I will be buying some of these treat cups soon!
Thanks Barb!! I am going to make those for my family (only I will probably fill them with beads, there are a lot of bead freaks in my family, like me). Have a great day!
These are great...such a cute design!
Thanks for sharing a new way to do these - I think I like your idea better than the one I used - there are less holes that need to be cut or punched!
Post a Comment