Welcome to Snowmanlover's Paperie

For those of you new to my site, I retired as a a Stampin' Up Independent Demonstrator
I went back to teaching in a Special Ed Classroom after being home for 20 years and "retired"
My blog is now changing to a WREATH Blog!
If you are interested in purchasing my wreaths, please join my FB page,
Barb's Little Bit of
Whimsy Wreaths
Click here to join Here
To view and purchase from my Etsy Shop, click here!


I also post my "Simply Sunday" posts where I share recipes and home decor'

To "Follow", Subscribe, please go down to the right!
If you are "searching" for something, please type in your word where it says, "Search this Blog" on the right!


Showing posts with label Video. Show all posts

Sunday, April 4, 2010

My Craft Room Photos! Scoll to bottom of post to view VIDEO!

Here is my Revised, revised, revised, revised Craftroom. I have to admit my slide show on the right is much neater version, but that was when I had less stuff!
We closed off our living and dining room with French Glass doors and separated the two rooms, four years ago.  This was the kid's craft room/playroom before I took over two years ago. After buying all of my "Bugs", I kind of took over the room,  but they have access to all my craft things.

Photos start and go around in a circle. It was buying the rods to store my Stampin' Up punches that got me to redo a few things! Enjoy!

You are now entering my Craftroom from the Kitchen. This is my "pull out area" I had the file cabinet for about 25 years and added the  narrow "desktop" so I could use this for a cutting area. I also threw in another set of plastic drawers and keep my stamp sets in there too. Stamps everywhere!


My main work desk.  This is my stamping desk where I make my Stampin' Up Cards.
I got this desk about 25 years ago. Underneath, I have red and navy bins on wheels with chalkboards on the front. I store more paper and cardstock in the bins in files. I like to be organized!  I keep my Stampin' Up Inkspots, Crayons, Pencils, Adhesives in the set of black plastic drawers. I keep stamp sets and ribbon packages in the Jetmax cubes to the right.


My Ink Center. My little girl decorated this and the Embellishment Center.


Embellishment Center, ribbon, buttons, bows!


Close up of Desktop


Punch Storage on Bygel Rods. I am so happy with these!! This is what got me in the mood to change things around!


Back of room, looks into Living room.  Stampin' Up Cardstock Storage


Left Shelves
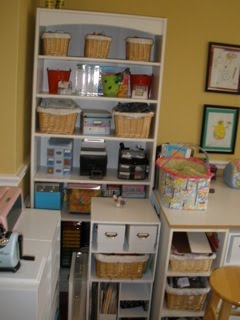

This was the kid's Art Table,  that my hubby built for them, but I took it over for my "bugs".
I stand when I use the machines. It is a really deep space.
I moved their art work to this side because the wall was soooo busy with the Embellishment Center here. It drives me crazy with how busy this wall was and still is!


 I just found these little white CD cases and put them in the openings of the Jetmax Cubes. I used to have little ladybug boxes there and kept my overlays and and booklets filed in them. Now I put those back in their boxes and use these new CD cases to store my new plastic cases from SU. I redid a bunch of my stamps and store them in there now. The drawers also house stamps.
The little plastic bins in the middle store more cardstock and envelopes.

 Right Shelf space

Right Shelf space. More Artwork from Preschool


This is where I live- at my Computer and work my business! I love this Tressle Desk. I love being able to look out my backyard through the bay window. The kitchen is to my right.


Ok, we made a full circle now of my little dining room, turned playroom, turned Craftroom/Office! This is another entry into the room and to the right of my desk and the bay windows.  These  cubes  house embellishments and books.


I hope you enjoyed my tour. Would love to hear your comments!

! Click HERE  for the Video Tour of my Craftroom!

Friday, November 13, 2009

Christmas with the Cricut Fancy Card Friday!/Video!

Hi friends,
It is time for Fancy Card Friday from CWTC
This was my most fun project to do!
Again, I have made two cards for this day. Be sure to check out the Video on the second card, below. I really had fun making these! I started them out as my "simple cards" but switched them to the "Fancy" card category! I wish you could see this one in person, it is so much prettier and just sparkles with glitter! I think this is my favorite card but it looks much better in person. Enjoy!
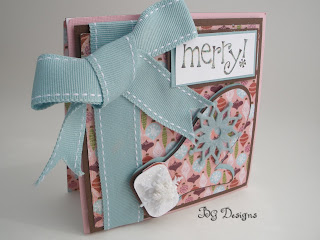
Merry Mitten Card


Merry Mitten Materials:

Winter Woodland Cartridge
Basic Grey Eskimo Kisses Double Sided Paper
Plastic Snowflake embellishment from last year's stash!
The following are all from Stampin' Up:
Chocolate Chip , Whisper White, Pretty in Pink and Baja Breeze (retired) Cardstock
Baja Breeze Ribbon (retired)
Chocolate Chip and Real Red Inks
Dazzlin' Diamonds and retired Little Felt Flurries
Stampin' Dimensionals and adhesive
Merry Set (retired)

Fancy Tree Card- to see "how to make" Video, please click HERE


Fancy Tree Card Materials:

Mini Monogram Cartridge for the Scalloped square
Winter Woodland Cartridge for the Tree
Basic Grey Eskimo Kisses Double sided paper
Peachy Pink Cardstock from my stash
The following items are all from Stampin' Up:
Chocolate Chip, and Whisper White Cardstock
Chocolate Chip 1 1/4" Double stitched ribbon
Chocolate Chip and Ruby Red Inks
Chocolate Chip Ink Spot
Stampin' Dimensionals and adhesive
All Holidays Stamp Set (front)
Level One Holiday Best Hostess Stamp Set (inside)

Thank you again so much for all of the nice comments and emails too!
If do not have a blogger account and want to make a comment, if you use the Anonymous button, please put your name so I know who you are :) (unless you want to be anonymous!)

Now, let's head on over to Okie's blog, to see what a fantastic card she made!

Monday, November 9, 2009

Christmas with the Cricut Simple Card Monday! Video!

Hi there, I am Barb from Snowmanlover's Paperie.
I am so honored to be a "Guest Designer" with CWTC!
Thank you, Joy, Melanie, Tammy, Provo Craft and Core'dinations!
I really enjoyed creating my projects, so I hope you like!
My assignments this week are to use the Winter Woodlands and Mini Monogram Cartridges. Some of the projects will focus on both and some will be using one or the other. By the way, I am so into "non-traditional" Christmas colors for some reason this year!

Today is Simple Card Monday. I couldn't stop with just one so here are my two simple cards. Of course you know I love snowmen, so here is my first card!
Click HERE to see the VIDEO on how to make this simple little snowman card.

Simple Snowman


Materials used:
Winter Woodlands Cartridge
Basic Grey Eskimo Kisses Double Sided Patterned Paper
Core'dination's White Washed and Cranberry Cardstock
Paper Trey Ink Cardstock
All the following from Stampin' Up:
Chocolate Chip and Whisper White Cardstock
Chocolate Chip Ink
Chocolate Chip 1 1/4" Stitched Ribbon and retired curly brown ribbon
Merry Stamp Set (retired)
Stampin' Dimensionals and adhesive

This is my second card with Winter Woodlands. Might I mention, I just adore this Winter Woodlands Cartridge. I feel a real sense of serenity with all the "woodsy" stuff.

Woodsy Cardinal Card


Materials Used:
Winter Woodlands Cartridge
Basic Grey Eskimo Kisses Double Sided Patterned Paper
Core'dinations Cranberry Cardstock
and the following all from Stampin' Up:
Chocolate Chip, Kraft and Whisper White Cardstock
Level One Hostess Holiday Best Stamp Set
Jingle Bells Ribbon
Dimensionals and Uni-ball Signo Pen
Real Red Ink

Thank you so much for stopping by to take a look! I hope you can stop by each day this week.
Now hop on over to see Oakie's site, please to see her Simple Card Monday project.

Tuesday, September 22, 2009

Twick or Tweet Card

My first "How To" Video on How to make a SU Twick or Tweet Card!
Also Barb's Halloween Bundle

...Stay tuned on how to make a SU Twick or Tweet Card using the "Bundle" supplies! Click on the HERE, below to view video!!


Don't forget My Halloween Bundle ends on September 30th at 8 pm Central Time

Saturday, September 19, 2009

Flips!! My first video- just an intro

Got some FLIPS!! Thank you Lisa and Lori B from the Message Boards!
However I don't know how to transfer it to my computer yet. This video is done via my computer and not on my new Flip. My pup Meatball is in the background whining, so excuse my laugh!
I would LOVE if you could please leave some comments as to what type of tutorial you would like to have on SU Card Making? Thanks! Barb